Installing Python
Please Log In for full access to the web site.
Note that this link will take you to an external site (https://shimmer.mit.edu) to authenticate, and then you will be redirected back to this page.
Overview
This page guides you through installing Python on your computer and setting up an integrated development environment (IDE) in which to run Python code. There are separate instructions below for Windows and macOS.
The overall procedure is as follows:
- Set up a folder for your 6.100 psets.
- Install the base Python interpreter.
- Install the Visual Studio Code (VS Code) editor.
- Install the Python extension for VS Code.
- Install additional Python packages that we will use in this course.
Please follow the instructions carefully and exactly. Previous students have run into problems when they skipped steps that they thought weren't important. If you are unsure about what any of the instructions mean, ask a TA or LA during office hours.
Before starting, make sure your operating system is up-to-date. The instructions below have been tested with Windows 11, version 23H2 and macOS Sonoma 14.3.
Windows
Set up 6.100 folder
-
Create a folder called
6.100Asomewhere on your system. (Or call it6.100Lor6.100Bas appropriate.) -
Download the
1_pset0.zipfile from the top of the Pset 0 page. This file contains a compressedps0folder. Unzip the file to retrieve the folder, and move it into6.100A. The folder structure should look like this:6.100A |---ps0 |---ps0.py |---test_packages.py |---test_python.py- To clearly distinguish between zip files versus folders in File Explorer, you may need to enable File name extensions under View → Show.
Install base Python
-
Download the Python installer executable (big yellow button) from https://www.python.org/downloads/.
-
Run the executable file, and click through any security warnings. When the setup window appears, do not select any checkboxes at the bottom. Just click Install Now, which accepts all the default options.
-
At the end, the installer may ask you to Disable path length limit. Click this if you see it, and click through the security warning.
-
To verify the installation, open the Command Prompt from the Start menu. Type
py -3(note the space) and pressEnter. You should see Python's>>>prompt.C:\Users\bob>py -3 Python 3.12.1 (tags/v3.12.1:2305ca5, Dec 7 2023, 22:03:25) [MSC v.1937 64 bit (AMD64)] on win32 Type "help", "copyright", "credits" or "license" for more information. >>> -
To exit Python, press
Ctrl+Zand thenEnter. This should take you back to the native Windows command prompt. To exit that, typeexitand pressEnter.
Install VS Code
-
Download the VS Code installer executable (big blue button) from https://code.visualstudio.com/.
-
Run the executable file, and click through any security warnings. Accept all the default options as you click through the setup.
-
When you click Finish, VS Code should launch with a Welcome tab. Ignore and close any recommendations that pop up in the bottom right.
-
Open the Explorer pane from its icon (first one) in the top left. Click Open Folder, navigate to and select your
6.100Afolder, and click Open. When the security warning about trust pops up, click Yes, I trust the authors. -
From the top menu bar, go to Files → Preferences → Settings, and a Settings tab will appear. Under the User category, go to Text Editor → Files, and check the boxes for the following options. (They are listed in alphabetical order.)
- Insert Final Newline
- Trim Final Newlines
- Trim Trailing Whitespace
Close the Settings tab when done.
Install the Python extension
-
Open the Extensions pane from its icon (fifth one) in the top left.
-
You can either search for the Python extension from Microsoft, or it may already appear in the list of POPULAR extensions.
-
Click on the tile result, which opens an Extension: Python tab. Make sure it's the official extension from Microsoft, and click Install.
-
When installation completes, you should see the Python extension tile under the INSTALLED category. There may be a couple other Python-related extensions from Microsoft as well.
-
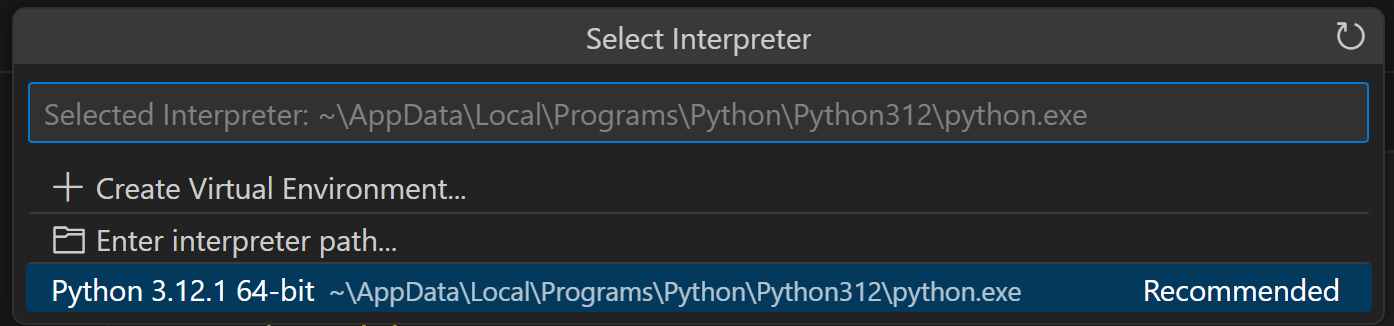
Open the Explorer pane again, and navigate to your
ps0folder. Double clicktest_python.pyto open it in a tab. At the very bottom right, you should see the word Python along with the version number of your Python installation. When you click the version number, a drop-down from the top center should list exactly which executable file is being used as the Python interpreter.
-
Press
Escto close the drop-down, and click the Run Python File play button in the top right. This should open a TERMINAL pane at the bottom with the execution of thetest_python.pyfile. -
Click in the terminal pane, type your response to its query, and press
Enter. The program should repeat what you typed. -
Click the Kill Terminal trash button to close the terminal.
-
Now close VS Code and open it again from the Start menu. This allows the Python extension's settings to appear when we open Settings and navigate to Extensions → Python. Enable the setting Terminal: Execute in File Dir.
Do not skip this step! -
Run the
test_python.pyfile again. This time, you should see the>prompt appear twice in the terminal, with the full path to theps0folder displayed before the second one. Click the trash button to kill the terminal, and close the Settings tab.
Install Python packages
-
Open a new terminal in VS Code by going to Terminal → New Terminal in the top menu bar.
-
Type each of the following commands, followed by
Enterto execute. Do not type the>; that just indicates the prompt.> py -3 -m pip install numpy > py -3 -m pip install matplotlib > py -3 -m pip install pandas > py -3 -m pip install scikit-learn > py -3 -m pip install seabornIgnore any warnings in the output about a certain directory not being on
PATH. -
After the first command, you don’t have to completely retype the subsequent commands. By pressing the
Uparrow while in the terminal, you can access your command history, and just change the package name at the end. Kill the terminal when finished. -
Open the file
test_packages.py, and run it by clicking the play button. After a moment, you should see a plot of earthquake magnitudes over time. Ignore any deprecation warnings in the terminal output. -
Close the plot window, then kill the terminal.
That's it! For future psets and lecture code downloads, just unzip them into the 6.100A folder, and press the play button for any file you wish to run.
macOS
Set up 6.100 folder
-
Create a folder called
6.100Asomewhere on your system. (Or call it6.100Lor6.100Bas appropriate.) -
Download the
1_pset0.zipfile from the top of the Pset 0 page. This file contains a compressedps0folder. In Finder, double-click the file to unzip it, and move theps0folder into6.100A. The folder structure should look like this:6.100A |---ps0 |---ps0.py |---test_packages.py |---test_python.py
Install base Python
-
Download the Python installer package (big yellow button) from https://www.python.org/downloads/.
-
In Finder, double-click the package file to run it. Click through each page in the installer. At the Installation Type step, just directly click Install and enter your password to continue; don't click Customize.
-
When the installer finishes, a new Finder window will pop up. Click Close in the installer window and then Move to Trash.
-
Double-click Install Certificates.command in the Finder window. A Terminal window will pop up and run something briefly. Close the Terminal and Finder windows.
-
To verify the installation, open a new Terminal window. Type
python3and pressEnter. You should see Python's>>>prompt.bob@macbook ~ % python3 Python 3.12.1 (v3.12.1:2305ca5144, Dec 7 2023, 17:23:39) [Clang 13.0.0 (clang-1300.0.29.30)] on darwin Type "help", "copyright", "credits" or "license" for more information. >>>- If you have an older Mac, even with the latest macOS, the Terminal prompt (the text right before you typed
python3) may look slightly different, ending with a$instead of a%. This is okay.
- If you have an older Mac, even with the latest macOS, the Terminal prompt (the text right before you typed
-
To exit Python, press
Control+D. This should take you back to the native macOS Terminal prompt. To exit that, pressControl+Dagain, and then close the Terminal window.
Install VS Code
-
Download the VS Code installer zip file (big blue button) from https://code.visualstudio.com/.
-
In Finder, unzip the file, which produces a file Visual Studio Code.app. Drag the file to the Applications folder in the left-side navigation under Favorites.
- If you don't see the Applications folder there, navigate to it via Go → Applications in the menu bar. Then open another Finder window, and drag the app file across windows into Applications.
-
Double-click the app file to launch it, and click through the security warning. VS Code should launch with a Welcome tab. Ignore and close any recommendations that pop up in the bottom right.
-
Open the Explorer pane from its icon (first one) in the top left. Click Open Folder, navigate to and select your
6.100Afolder, and click Open. When the security warning about trust pops up, click Yes, I trust the authors. -
From the menu bar, go to Code → Settings... → Settings, and a Settings tab will appear. Under the User category, go to Text Editor → Files, and check the boxes for the following options. (They are listed in alphabetical order.)
- Insert Final Newline
- Trim Final Newlines
- Trim Trailing Whitespace
Close the Settings tab when done.
Install the Python extension
-
Open the Extensions pane from its icon (fifth one) in the top left.
-
You can either search for the Python extension from Microsoft, or it may already appear in the list of POPULAR extensions.
-
Click on the tile result, which opens an Extension: Python tab. Make sure it's the official extension from Microsoft, and click Install.
-
When installation completes, you should see the Python extension tile under the INSTALLED category. There may be a couple other Python-related extensions from Microsoft as well.
-
Open the Explorer pane again, and navigate to your
ps0folder. Double clicktest_python.pyto open it in a tab. At the very bottom right, you should see the word Python along with the version number of your Python installation. When you click the version number, a drop-down from the top center should list exactly which binary file is being used as the Python interpreter.
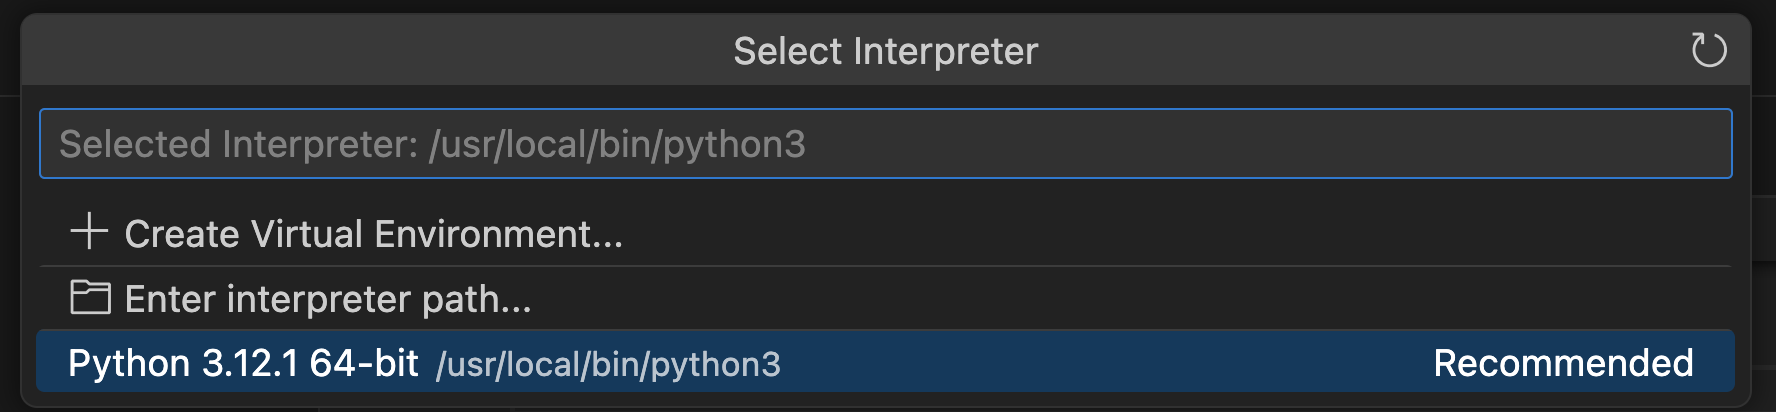
A small window about "python3" may pop up, asking to install the command line developer tools. Click Cancel, not Install.
-
Press
Escto close the drop-down, and click the Run Python File play button in the top right. This should open a TERMINAL pane at the bottom with the execution of thetest_python.pyfile. -
Click in the terminal pane, type your response to its query, and press
Enter. The program should repeat what you typed. -
Click the Kill Terminal trash button to close the terminal.
-
Now close VS Code and open it again from the Start menu. This allows the Python extension's settings to appear when we open Settings and navigate to Extensions → Python. Enable the setting Terminal: Execute in File Dir.
Do not skip this step! -
Run the
test_python.pyfile again. This time, you should see the%prompt appear twice in the terminal, with theps0folder name displayed before the second one. Click the trash button to kill the terminal, and close the Settings tab.
Install Python packages
-
Open a new terminal in VS Code by going to Terminal → New Terminal in the menu bar.
-
Type each of the following commands, followed by
Enterto execute. Do not type the%; that just indicates the prompt.% python3 -m pip install numpy % python3 -m pip install matplotlib % python3 -m pip install pandas % python3 -m pip install scikit-learn % python3 -m pip install seabornIgnore any warnings in the output about a certain directory not being on
PATH. -
After the first command, you don’t have to completely retype the subsequent commands. By pressing the
Uparrow while in the terminal, you can access your command history, and just change the package name at the end. Kill the terminal when finished. -
Open the file
test_packages.py, and run it by clicking the play button. After a moment, you should see a plot of earthquake magnitudes over time. Ignore any deprecation warnings in the terminal output. -
Close the plot window, then kill the terminal.
That's it! For future psets and lecture code downloads, just unzip them into the 6.100A folder, and press the play button for any file you wish to run.